Error
Errors:
Turtle Graphics
Turtle Commands
Commands are how we tell Tracy the Turtle to do things.Tracy knows several built-in commands.
Movement
The forward command makes Tracy move forward a given distanceforward(10) forward(50) forward(200)The backward command makes Tracy move backward a given distance
backward(10)
backward(50)
backward(200)
Negative values can also be used to move Tracy forward or backward
backward(-200)
forward(-200)
Position
Tracy is positioned in an (x, y) coordinate plane like so: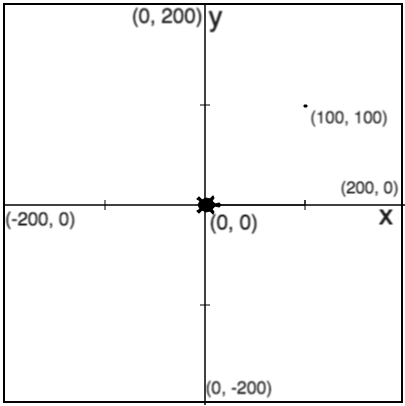 Each point in Tracy's world can be located by an (x, y) coordinate. For example:
- The center of the world is (0, 0)
- The top middle of the world is (0, 200)
- The bottom left of the world is (-200, -200)
- And so on...
setposition or goto commands to send Tracy to a specific location
# Send Tracy to the center of the world
setposition(0, 0)
goto(0, 0)

# Send Tracy to the far right middle of the world
setposition(100, 0)
goto(100, 0)

# Send Tracy to the top right corner of the world
setposition(200, 200)
goto(200, 200)
We can also set only Tracy's x or y location using
setx or sety
# Set Tracy's x position to be 100
# The y position stays the same
setx(100)

# Set Tracy's y position to be 100
# The x position stays the same
sety(100)
Rotation
We have a few command options when we want to turn Tracy to face a new direction.The
left(degrees) command will turn Tracy to the left a set number of degrees.
# Tracy will turn 90 degrees to the left
left(90)

# Tracy will turn left 180 degrees and
# face the opposite direction
left(180)

# Tracy will turn left a full 360 degrees
# and do a complete spin
left(360)
The
right(degrees) command will turn Tracy to the right a set number of degrees.
right(90)
right(180)
right(360)
Negative values can also be used to turn Tracy right or left
right(-90)
left(-90)
We can use the
setheading command (or seth) to set Tracy to a specific direction
# Set Tracy to point right
setheading(0)

# Set Tracy to point up
setheading(90)

# Set Tracy to point down
seth(270)
Circles
The circle command makes Tracy draw a circle above her with specified radiuscircle(10) circle(100)Another parameter can be used to draw only certain portions of a circle
# This command will draw a semi-circle
circle(10, 180)

# This command will draw a quarter-circle
circle(10, 90)
An additional parameter can be used to control the number of points in the shape
# This command will draw a triangle
circle(10, 360, 3)

# This command will draw a square
circle(10, 360, 4)
Pen
When thepenup command is used, Tracy will not leave a trail as she moves
# Tracy will move 50 pixels without leaving a trail
penup()
forward(50)
When the
pendown command is used, Tracy will leave a trail when she moves
# Tracy will move to location (50, 50) with a trail behind her
pendown()
goto(50, 50)
Note: Tracy always starts with the pen down!
Controlling the Pen Size
We can use the
pensize command to set the size of the pen
# Normal, line width of 1
# This is the default size
pensize(1)

# Bigger, line width of 10
pensize(10)
Speed
We can set Tracy's speed using thespeed command.
Note: Speed options go from 0 to 10.
# Slowest
speed(1)

# Normal
speed(6)

# Fast
speed(10)

# Fastest (almost immediate)
speed(0)
Color
Thecolor command can be used to change the color of Tracy and her trail while the bgcolor command is used to change the color of the canvas. Find a list of color acceptable names at this website.
# Draws a red line
color("red")
forward(50)

# Draws a blue line
color("blue")
forward(50)

# Some color options:
color("black")
color("blue")
color("brown")
color("cyan")
color("gold")
color("gray")
color("green")
color("indigo")
color("orange")
color("pink")
color("purple")
color("red")
color("violet")
color("white")
color("yellow")
Hexcodes can also be used to set a larger array of colors. This hex color picker website can be used to generate hex color codes.
# Set color to a specific purple using hexcode #8631C3
color("#8631C3")
You can also set the color of the background using the bgcolor command.
# Sets background color as purple
bgcolor("purple")
Filling
Thebegin_fill() and end_fill() commands can be called around a set of movement commands to fill in the shape being drawn.
# To draw a filled shape, start with this call
begin_fill()

# Draw your shape
for i in range(3):
    forward(50)
    left(120)

# Stop filling once you have drawn the shape
end_fill()
Cursor Shape
By default, the cursor will be set to Tracy's shape which is a turtle. We can use theshape command to set the cursor to a different shape.The shape options that can be used are:
- "arrow"
- "turtle"
- "circle"
- "square"
- "triangle"
- "classic"
# This will change the cursor shape to a circle
shape("circle")
Clear Screen
To clear the screen of any markings, use theclear command, which can be used anytime throughout the code.
# This will clear the screen after the square is drawn
for i in range(4):
    forward(50)
    left(90)
clear()

# This will clear the screen before drawing the square
circle(50)
clear()
for i in range(4):
    forward(50)
    left(90)
Painting Corners Back to Empty
In addition to usingclear() to wipe the whole screen, you can also "erase" or reset
individual corners by painting them back to empty. This is done by calling paint('').
# This will paint two corners red, then paint one corner back to empty
paint(color['red'])
move()
paint(color['red'])
turn_around()
move()
paint('')   # Paints the corner back to empty
turn_around()
move()
This is useful if you want to reset or remove just one square/corner without clearing the entire canvas.
Loops
Loops help us repeat commands which makes our code much shorter. Make sure everything inside the loop is indented one level!For Loops
Use for-loops when you want to repeat something a fixed number of times.
# Instead of repeating code over and over
forward(10)
left(90)
forward(10)
left(90)
forward(10)
left(90)
forward(10)
left(90)

# Use a for loop to repeat the code!
for i in range(4):
    forward(10)
    left(90)
You can use the i variable inside the loop.i starts at 0, and goes up to COUNT-1.
# This will make Tracy move forward 0, then 1, then 2
for i in range(3):
    forward(i)

# You can change the value of i inside a for loop by using mathematical expressions
for i in range(3):
    forward(i*10)
You can also control the value of i by using extended parameters.
for i in range(STARTING_VALUE, ENDING_VALUE, INCREMENT):
# This will move Tracy forward 25, 50, and 75 pixels
for i in range(25, 76, 25):
    forward(i)
Note: The ending value is not included.
While Loops
Use while loops when you want to repeat something an unknown number of time or until a condition becomes false. If there is no point where the condition becomes false, you will create an infinite loop which should always be avoided!
# Keep drawing circles until the count variable is greater than 5
# If count variable is not updated, an infinite loop will occur
count = 0
while count <= 5:
    circle(50)
    count = count + 1
You can also use user input to control a while loop
# This code will continue running while the user answers 'Yes'
should_continue = input("Continue code?: ")
while should_continue == "Yes":
    forward(10)
    left(90)
    should_continue = input("Continue code?: ")
One condition that we can use is while True: which, on its own, would create an infinite loop, which we do not want.If we pair this condition with a
break statement somewhere inside the loop, then there is another way to exit the loop and the infitie loop can be avoided.
# This code will continue running while the user answers 'Yes'
while True:
    should_continue = input("Continue code?: ")
    if not should_continue == "Yes":
        break
    else:
        forward(10)
        left(90)
Note: The break statement is not followed by a set of parentheses.
Functions
Writing a function is like teaching Tracy the Turtle a new word. Naming Functions: You can name your functions whatever you want, but you can't have spaces in the function name. Instead of spaces, use underscores ( _ ):like_this_for_example
Make sure that all the code inside your function is indented one level!
Defining a Function
We define a function to teach Tracy the instructions for the new word.
# Code that will run when you make a call to this function.
def name_of_your_function():

# EXAMPLES

# Teach Tracy to draw an edge
def draw_edge():
    forward(50)
    left(90)

# Teach Tracy to draw a blue edge
def draw_blue_edge():
    color("blue")
    forward(50)
    left(90)

# Teach Tracy to draw a square
def draw_square():
    for i in range(4):
        draw_edge()
Using Parameters in Functions
We use parameters to alter certain commands in our function.
# Use a parameter to control the radius of the circle being drawn
def draw_circle(radius):
    circle(radius)

# Multiple parameters can be used in one function

# Parameters control the length of square sides and color
def draw_square(length, color_choice):
    color(color_choice)
    for i in range(4):
        forward(length)
        left(90)
Calling a Function
We call a function to get Tracy to actually carry out the new command.# Call the draw_edge() function once # Tracy will draw one edge draw_edge() # Call the draw_edge() function 3 times # Tracy will draw 3 edges draw_edge() draw_edge() draw_edge() # Call the draw_square() function with parameters # Tracy will draw 3 squares with different sizes and colors draw_square(50, "red") draw_square(100, "blue") draw_square(75, "orange")
Returning Values from a Function
We can use thereturn keyword to return a value from a function back to the code it was called from.
# Update the value of num and return it
def increase(num):
    num += 100
    return num
We can use this returned value right in our commands:
# Draw a circle with a radius as returned from the increase function
def increase(num):
    num += 100
    return num

circle(increase(50))
Variables
Variables & Shortcut Operators
We use variables to store values that can be used to control commands in our code. The variable values can also be altered throughout the code.
# Make a variable to keep track of something
count = 0

# We can update the value of the variable using mathematical expressions

# This will add one to the value of the count variable
count = count + 1
# Note: This shortcut operator will do the same thing!
count += 1

# Variable values can also be altered inside control structures

# The value of the variable count will increase by 1 on every loop iteration
for i in range(4):
    forward(10)
    count += 1
Note: For more information on shortcut operators, check out this article!
Data Types
The data we store in variables will most likely fit into one of the following types:- String (str): A character of group of characters
- Integer (int): A whole number
- Floating Point Number (float): A decimal value
- Boolean (bool): A True or False value
# Turn var_1 into an integer
var_1 = "10"
var_1 = int(var_1)
# Now var_1 can be used in mathematical expressions

# Turn var_2 into a string
var_2 = "505"
var_2 = str(var_2)
# Now var_2 can be concatenated with other strings to print a message

# Turn var_3 into a floating point number
var_3 = 5
var_3 = float(var_3)
# Now var_3 will be treated as 5.0 when used in mathematical expressions
We can also use the
type function to determine the type of a variable.
# Print out the type of the entered value
print(type("25")
# Will print the type out as 'str'
Input
We can use input from the user to control our code.The input function
We can ask for text input from the user with theinput function.
# Ask the user for input and save it to a variable to be used in code
# This will only work if the input is being used as a string
circle_color = input("What is the color of the circle? ")

# If input needs to be used as a number, cast to an 'int'
radius = int(input("What is the radius of the circle? "))

# This input can then be used to control different parts of the code
color(circle_color)
circle(radius)
The onclick Method
We can allow the user to interact with our programs using theonclick method which makes a call to a callback function.
# Define the callback function
# (must take parameters for x and y coordinate of mouse click)
def make_square(x, y):
    for i in range(4):
        forward(50)
        left(90)

# When user clicks on cursor, perform callback function
onclick(make_square)
Note: A set of parentheses is not used when calling the callback function inside the onclick method.We can also allow the user to click anywhere on the canvas by using the
getscreen function.
# Save screen to canvas variable
canvas = getscreen()

# Call move_to_click function when canvas is clicked
canvas.onclick(move_to_cursor)
To use a variable inside a callback function, define it after the
onclick method is used and use it on the name of the variable the screen is saved to.
# Increase and print the value of count each time user clicks the screen
def increase(x, y):
    canvas.count += 1
    print(canvas.count)

canvas = getscreen()
canvas.onclick(increase)
canvas.count = 0
If/Else Statements
We can tell Tracy how to make decisions using if/else statements. Make sure that all the code inside your if/else statement is indented one level!If Statements
Use an if statement to tell Tracy to do something only when a condition is true. If the condition is false, Tracy will skip the commands indented underneath.
# Tracy will only draw a circle if the count variable is less than 5
if count < 5:
    circle(50)
If/Else Statements
Use an if/else statement to force Tracy to make a decision between multiple conditions. If the first condition is false, Tracy will skip to the next condition until she finds one that is true. If no conditions are true, the commands inside the 'else' block will be performed.
# Tracy will draw a circle if count variable is less than 5
if count < 5:
    circle(50)
# Tracy will draw a square if count variable is greater than 5
elif count > 5:
    circle(50,360,4)
# In any other case, Tracy will draw a line
# The only other case that exists outside the boundaries stated is if count = 5
# We do not include a condition for else statements
else:
    forward(50)
Text
print function can be used to print text to the console (the box underneath the canvas).
# Print the message
print("Hello World!")

# Print the number
print(50)
Different values can be combined inside our print statements. We can use the + operator to combine them which is called concatenation. We can also use the format method to combine values.Note: All of the text being combined must be of the same type.
# Print the personalized message
name = "Tracy"
print("Hello " + name)

message = "Hello {}"
print(message.format(name))

# Print the label
# Note: value must be cast to str type
value_type = "Radius"
value = 35
print(value_type + ": " + str(value))

label = "{}: {}"
print(label.format(value_type, str(value)))
Write
To add text to the canvas (the box where Tracy draws), we use thewrite function. The label for the text is given as a parameter, with optional parameters to change the font attributes or location of the text.
# Add a label using default text attributes
write("Hello World!")

# Add a label using 20pt Arial font
write("Hi", font=("Arial", 20))

# Add a label centered around Tracy
write("Tracy", align="center")
Some fonts that can be used are:
- "Arial"
- "Courier New"
- "Georgia"
- "Times New Roman"
- "Trebuchet MS"
- "Verdana"
- "Futura"
- "Comic Sans MS"
- "Monospace"
- "Cursive"
- "Fantasy"
- "center"
- "left"
- "right"
String Methods
We can use methods to alter the way text is written.Some methods we can use are:
- capitalize: Capitalize first letter of string and make all subsequent letters lowercase
- upper: capitalize every letter in a string
- lower: make every letter in a string lowercae
string = "hello world"

# Prints string with 'H' and 'W' capitalized
print(string.capitalize())

# Prints string with every letter capitalized
print(string.upper())
We also have some string methods that can be used in conditionals based on the values inside a string.
Some conditional string methods are:
- isalpha: returns True if all characters are letters a-z or A-Z
- isdigit: returns True if all characters are numbers 0-9
- isnumeric: returns True if all characters are numbers 0-9
- isupper: returns True if all letters in string are uppercase
- islower: returns True if all letters in string are lowercase
- startswith(value): returns True if the string starts with the given value
- endswith(value): returns True if the string ends with the given value
# Draws a blue circle
name = "ronaldo"

if name.islower(): #True
    color("blue")
if name.isdigit(): #False
    penup()
if name.startswith("r"): #True
    circle(50)
Comments
We use comments to leave notes about the code to the reader. Comments are not actually run by Python, they are just there to help us read the code. We can make multiline comments with""" and single line comments with #
"""
A multi-line comment describes your code
to someone who is reading it.
"""

# Use single line comments to clarify code.
Slides and Notes
No slides available for this video
Collaborate on this sandbox program!
Admin Only. Not visible to customers
A collaborative program is a program you can work on with a partner or group of people. The program shows up in all of your sandbox pages, and when any of you save code, it will save it for each person.
Current Collaborators:
Embed Your Code On an HTML Page
Want to use your CodeHS code outside of CodeHS? Use this embed code to get started.
How to Use
Version 1: On Your Computer
- Create a file called
codehs.htmlon your desktop - Put the html below into the codehs.html file and save it
- Now double click the file to open it in a web browser
Version 2: Online
- Create a file called
codehs.htmlon your desktop - Put the html below into the codehs.html file and save it
- Upload this file to the internet
- Visit your web page
Note this only works on single files currently.
About
Python (turtle)
Skulpt 1.0.0, Python 2.x
Author
No User